(continued from Create Cheques)
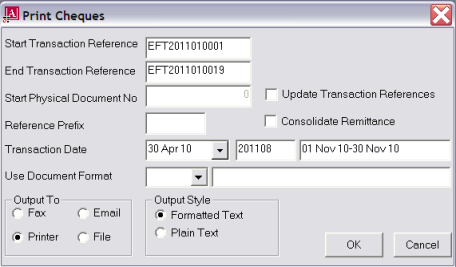
Screen Shot 25: Print Cheques Dialogue
Start/End Transaction Reference (20 Chars)
These are selection filters. The system is being asked to print cheques from cheque transactions that have a reference which falls between (and includes) the Start and End Transaction References that have been defaulted here.
|
|
If transactions are to be printed using either Print Remittances or Output EFT, selection filter screens similar to that in Screen Shot 19: Cheque Writer–Invoice Filter need to be completed. These filters include Transaction Reference From/To. Once the selection filters have been entered, payment transactions can be tagged for printing or reprinting. |
The Start Reference is the Prefix and Starting Cheque Reference from the Create Cheques screen (Screen Shot 24: Create Cheques Screen–Create Cheques). The system has calculated the number of cheque transactions that were created and incremented the Start Transaction Reference to arrive at the End Transaction Reference.
Start Physical Document No. (Numeric 15.0)/Update Transaction References (Checkbox)
By default, the transactions will be printed using the references from the Start/End Transaction Reference fields. If a different reference needs to be given, then it can be entered into this field. The Start Physical Document No field will only be active when Update Transaction References is checked. This means that the cheque transactions will have their original reference (EFT:2011010001 etc.) overwritten with the starting reference given in the Start Physical Document field, plus the prefix entered in the Reference Prefix field below (if used).
Reference Prefix (5 Chars)
If a new reference is entered in the Start Physical Document field, a new Reference Prefix can be entered here if necessary.
Transaction Date (Date)
This is the date that will print on the document.
|
|
Transaction, age and posting periods that were set on the basis of the date entered in the Create Cheques Screen (Screen Shot 24: Create Cheques Screen–Create Cheques) are not affected by any change of date in this field. |
Use Document Format (Drop-down)
Select the document format to use. Format templates that will be available are:
|
|
Document templates must have previously been set up in Messaging. See System Setup Training Guide. |
Output To (Radio Button)
There are 4 output options available:
|
|
To utilise this option, Tourplan compatible fax software must be installed. |
|
|
To utilise this option, a MAPI compliant email application must be installed—Outlook, Outlook Express, Eudora, Lotus Notes etc. |
|
|
Email output is always plain text—all formatting and graphics are removed. |
OK
To output the document, click the OK button.
Cancel
To cancel output, click the Cancel button.
(continued in Output Documents EFT)
 Tourplan iS V2.07 Accounts 2 Training Guide
